|
|
Removing and Reinstalling the Oil Filter
Tools Needed: 22mm wrench
Note: The distributor cover is pictured off of the engine. The filter can of course be removed with the cover on the engine.
 From top to bottom: distributor cover, oil filter, rubber packing seal and by-pass valve. Place an oil catch under the by-pass valve and use a 22mm wrench on the bottom of the by-pass valve to unscrew it. |
 Remove the old filter, cut the paper element off the spool with a razor knife and inspect the element for metal particles. Discard. Install the rubber packing into the new filter...
|
 ...if you install the rubber packing on the by-pass valve you stand a good chance at damaging the packing. Clean old oil any fines out of by-pass valve with your favorite solvent. I use a little gasoline. |
 Press by-pass valve into packing seal and new filter. Check condition of by-pass O-ring while you're at it. Also, never monkey with the by-pass valve setting (the screw on the side)...don't be curious...just leave it alone. |
 Slip the filter assembly back up into the distributor cover and screw it home. Snug it up with the 22mm wrench...not too tight...snug and then a 1/4 turn or you'll wear out the O-ring. |
Oil BY-Pass Valve Service
Tools Needed: Center punch, hammer and large flat blade screw driver.
Time Required: 15 minutes
: Don't do this. It isn't necessary. Leave it alone. This valve is set to 10-13 p.s.i. at the factory. The screw is easy to turn and change the setting. I am only addressing this for the occasional person who takes it apart and can't remember how it goes together. It took 9.7 turns to remove the screw on this particular by-pass plug. Yours may be different. This will get you into the ball park of the pressure setting if you are careful and lucky. Due as I say, not as I do.
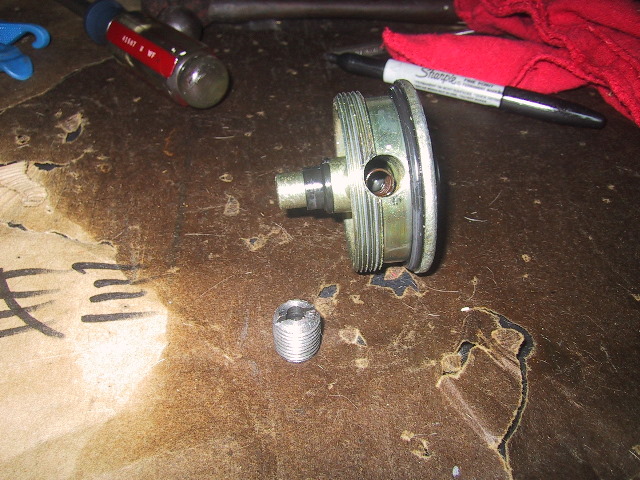
 Here is the oil filter plug or plate. At the top is the boss for the oil filter and the rubber seal that goes in the bottom of the filter. In the middle of the plug, the screw with the hole in it...this is the by-pass valve. |
 Using a center punch and hammer, make alignment marks so you can count the turns it takes to remove the screw. At the 2 o'clock position, there is a punch mark just below the slot and another just right of it on the plug housing. |
 Use a large flat blade screw driver to slowly turn the by-pass valve screw CCW (left) until it can be removed. Take great care to remember how many turns it takes to remove the screw. Be smart and write down each turn so you don't bugger yourself! |
 The by-pass screw is removed, looking down the hole you can see the spring sitting on top of the ball bearing. |
 Here are the by-pass screw, spring and ball bearing in order of removal. Note how I wrote down each complete turn of the screw for removal. It took a total of 9.7 turns. Remember where the screw punch mark was when removing and start the screw back in the same position when reassembling. |
|
|