|
|
|
|
Removing & Installing The Propeller Shaft
Tools Needed: 13mm wrench, pliers, large flat blade screwdriver, drift and hammer.
 Propeller shaft collar (doughnut), flexible joint driven disk (fork), driveshaft and final drive ready to be parted. |
 Pull the propeller shaft collar and flex joint driven disk off... |
 ...the splined end of the driveshaft. |
 Separate the two with a pry bar or large screwdriver. |
 Examine the rubber for cracks or deformation and replace the unit if needed. |
 Clean and examine the flex joint splines for wear/damage and replace if needed. |
 Clean and examine the driveshaft splines and C-clip. Note which groove the clip is in. 95% of the time it is in the middle groove. Replace any defective parts. |
 Some driveshaft U-joints have grease zerks and some don't. Disassembly of the U-joint will be covered in Chapter 7.5. |
 Behind the U-joint is the wedge pin. This must be removed to free the driveshaft from the final drive. |
 Use pliers or your fingers to straighten the cotter pin holding the castellated nut... |
 ...and remove it. |
 Use a 13mm wrench to remove the castellated nut. |
 The wedge pin must be driven out starting at the threaded end. |
 Use a drift and hammer to tap the wedge pin through. |
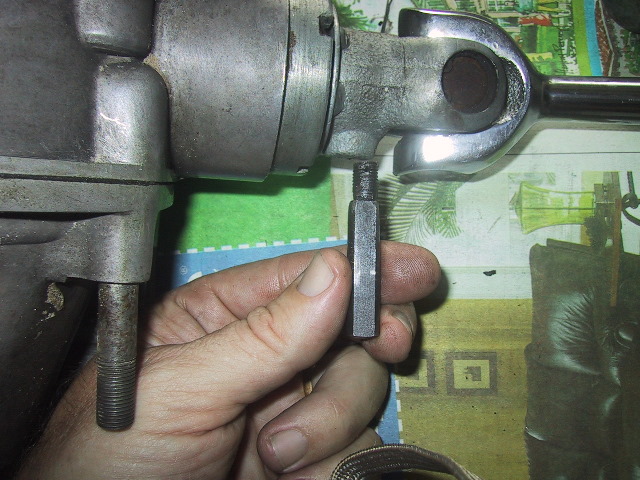 The wedge pin has two flat sides... |
 ...two round sides one of which has... |
 ...a tapered face. This taper must always be inserted so that it faces the drive splines. |
 You may now pull the driveshaft free. It may take some moderate force, but usually just a good tug. You can now see the splines of the pinion gear protruding from the final drive case.
|
 There are also some spacers used to put tension of the wedge bolt. They will sometimes be stuck in the grease on the end of the driveshaft. Otherwise they will be on the pinion gear splines in the final drive. |
 With the driveshaft removed you can now see the end of the pinion gear, Universal joint fork seal and pinion collar nut (large ring with the 4 slots). This nut is left hand thread. So right is loosen, left is tighten. Use caution if you remove it as the pinion gear may fall free which will in turn allow the 28 needle bearings at the other end to fall free. |
|
|